
Most customers don’t want to talk to support. They want answers. Fast.
A self-service help center gives users the freedom to solve problems on their own, without waiting for replies or opening tickets. When done right, it reduces support load, improves customer experience, and scales with your product.
In this guide, we’ll walk through how to create a self-service help center that users actually rely on.
Why Every Business Needs a Self-Service Help Center
A self-service help center helps customers get answers without waiting for support replies. Most users prefer solving simple issues on their own, especially when the information is clear and easy to access. A well-organized self-service help center makes that possible.
Studies show that more than 70 percent of customers expect companies to offer self-service support. At the same time, businesses that invest in a self-service help center often see fewer support tickets and faster resolution times. This creates a better experience for both users and support teams.
Here’s why a self-service help center matters for any business:
- Customers find answers anytime, even outside support hours
- Support teams handle fewer repetitive questions
- Response time improves for complex issues
- Users feel more confident using the product
- Support costs stay under control as the business grows
A self-service help center is not just a support tool. It becomes a long-term knowledge base that grows with your business and helps customers succeed without friction.

Types of Businesses that Need a Self-Service Help Center
Many types of businesses can benefit from a self-service help center, especially those that serve users at scale. When customers can find answers on their own, support becomes faster and more manageable.
Here are the types of businesses that need a self-service help center the most:
- SaaS companies with users spread across different time zones
- eCommerce stores that handle frequent questions about orders, shipping, and returns
- Marketplaces that support both sellers and buyers
- Subscription-based businesses with recurring user onboarding needs
- Digital product companies offering plugins, apps, or software tools
- Service-based businesses that receive the same questions from clients
- Growing startups with small support teams and rising user demand
For these businesses, a self-service help center reduces pressure on support teams and helps users get help whenever they need it, without waiting.
How to Create a Self-Service Help Center in Easy Steps
So you have come this far that means you want to create a help center yourself. So why don’t we see how to do that, shall we?
Step 1: Choose the Right Platform or Software to Start
As you are not using any custom coding to create the self service help center, then you need to choose the right platform.
If you’re using WordPress, weDocs is a reliable option for building a self-service help center. It offers a clean interface, well-structured documentation, and unlimited article creation.
With the built-in AI doc writer, you can draft help articles faster without starting from scratch. The AI-powered chatbot also helps users find answers instantly. Even non-technical users can create a professional knowledge base with minimal effort.
If you are not on WordPress, there are a few important things to consider before choosing a documentation tool.
- The tool should be easy to understand and simple to manage, even for non-technical users.
- A strong search feature is a must. AI-powered suggestions are a big plus.
- You should be able to match the help center with your brand using flexible layouts and themes.
- Look for role-based access, version control, and smooth content collaboration.
- The tool should work well with your existing CRM, helpdesk, or chatbot.
- Features like user permissions, password protection, and secure access are important.
- The platform should handle growth without slowing down or breaking.
- It should help you track user behavior and collect feedback to improve content.
- The help center must work smoothly on all devices, including mobile.
- Choose a pricing model that fits your budget, whether it is subscription-based or open-source.
In this guide, we’ll use weDocs to show how to create a self-service help center for WordPress-powered websites.
Read more: Things to Consider Before Choosing a WordPress Documentation Management Plugin
Step 2: Install and Activate the weDocs Plugin
Go to your WordPress Dashboard → Navigate to Plugins → Add New Plugin.
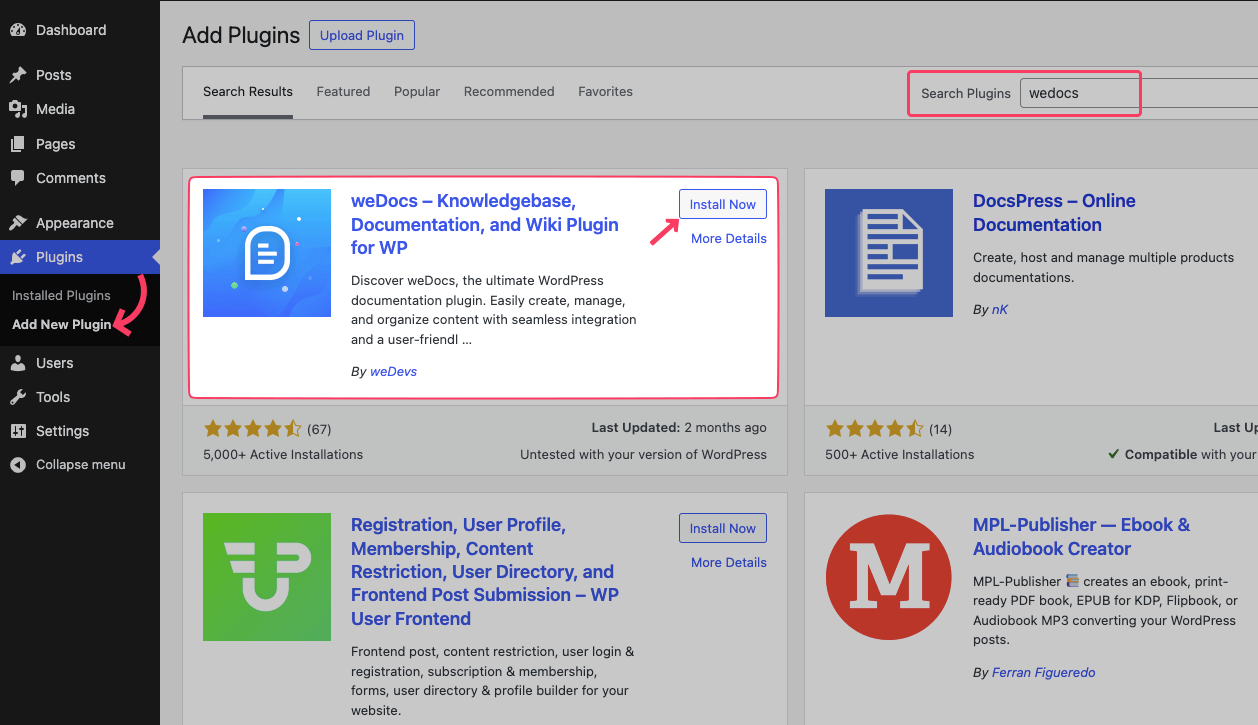
Type “wedocs” in the search bar. Look for “weDocs – Knowledgebase, Documentation, and Wiki Plugin for WP” by weDevs. Click the “Install Now” button. Once installed, click “Activate” to start using it. Now, you can create and manage your knowledge base easily!
Step 3: Create Sections and Articles As You Need
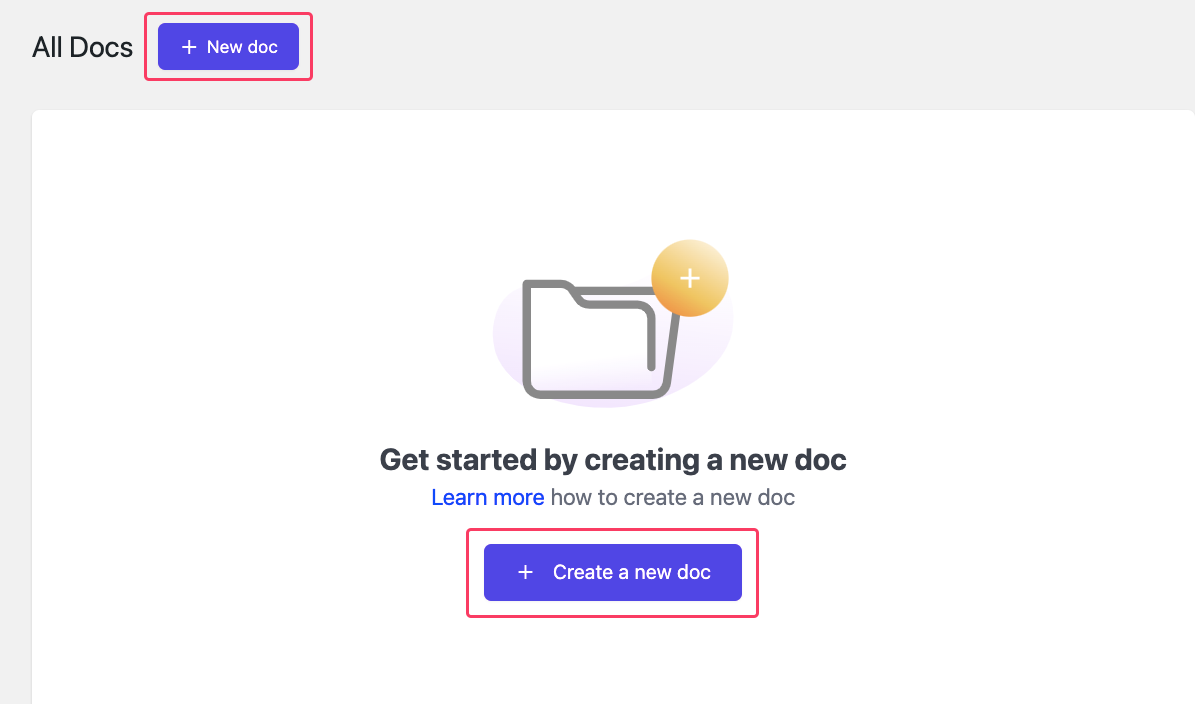
You’ll land on the Doc creation page after the successful activation of the plugin. Press the “+ New doc” button at the top. Or Click “Create a new doc” → Use the big blue button in the center. Then, add your content and save the document.
You can also create a doc by navigating to the weDocs menu from the left side admin panel.
Navigate to your WordPress dashboard and go to weDocs → Docs. Click the blue “+ New Doc” button to start creating a new document. Enter your document title in the title field. Once you’re done, click Publish and choose your preferred option. You can save the document as a draft or publish it immediately to make it live.
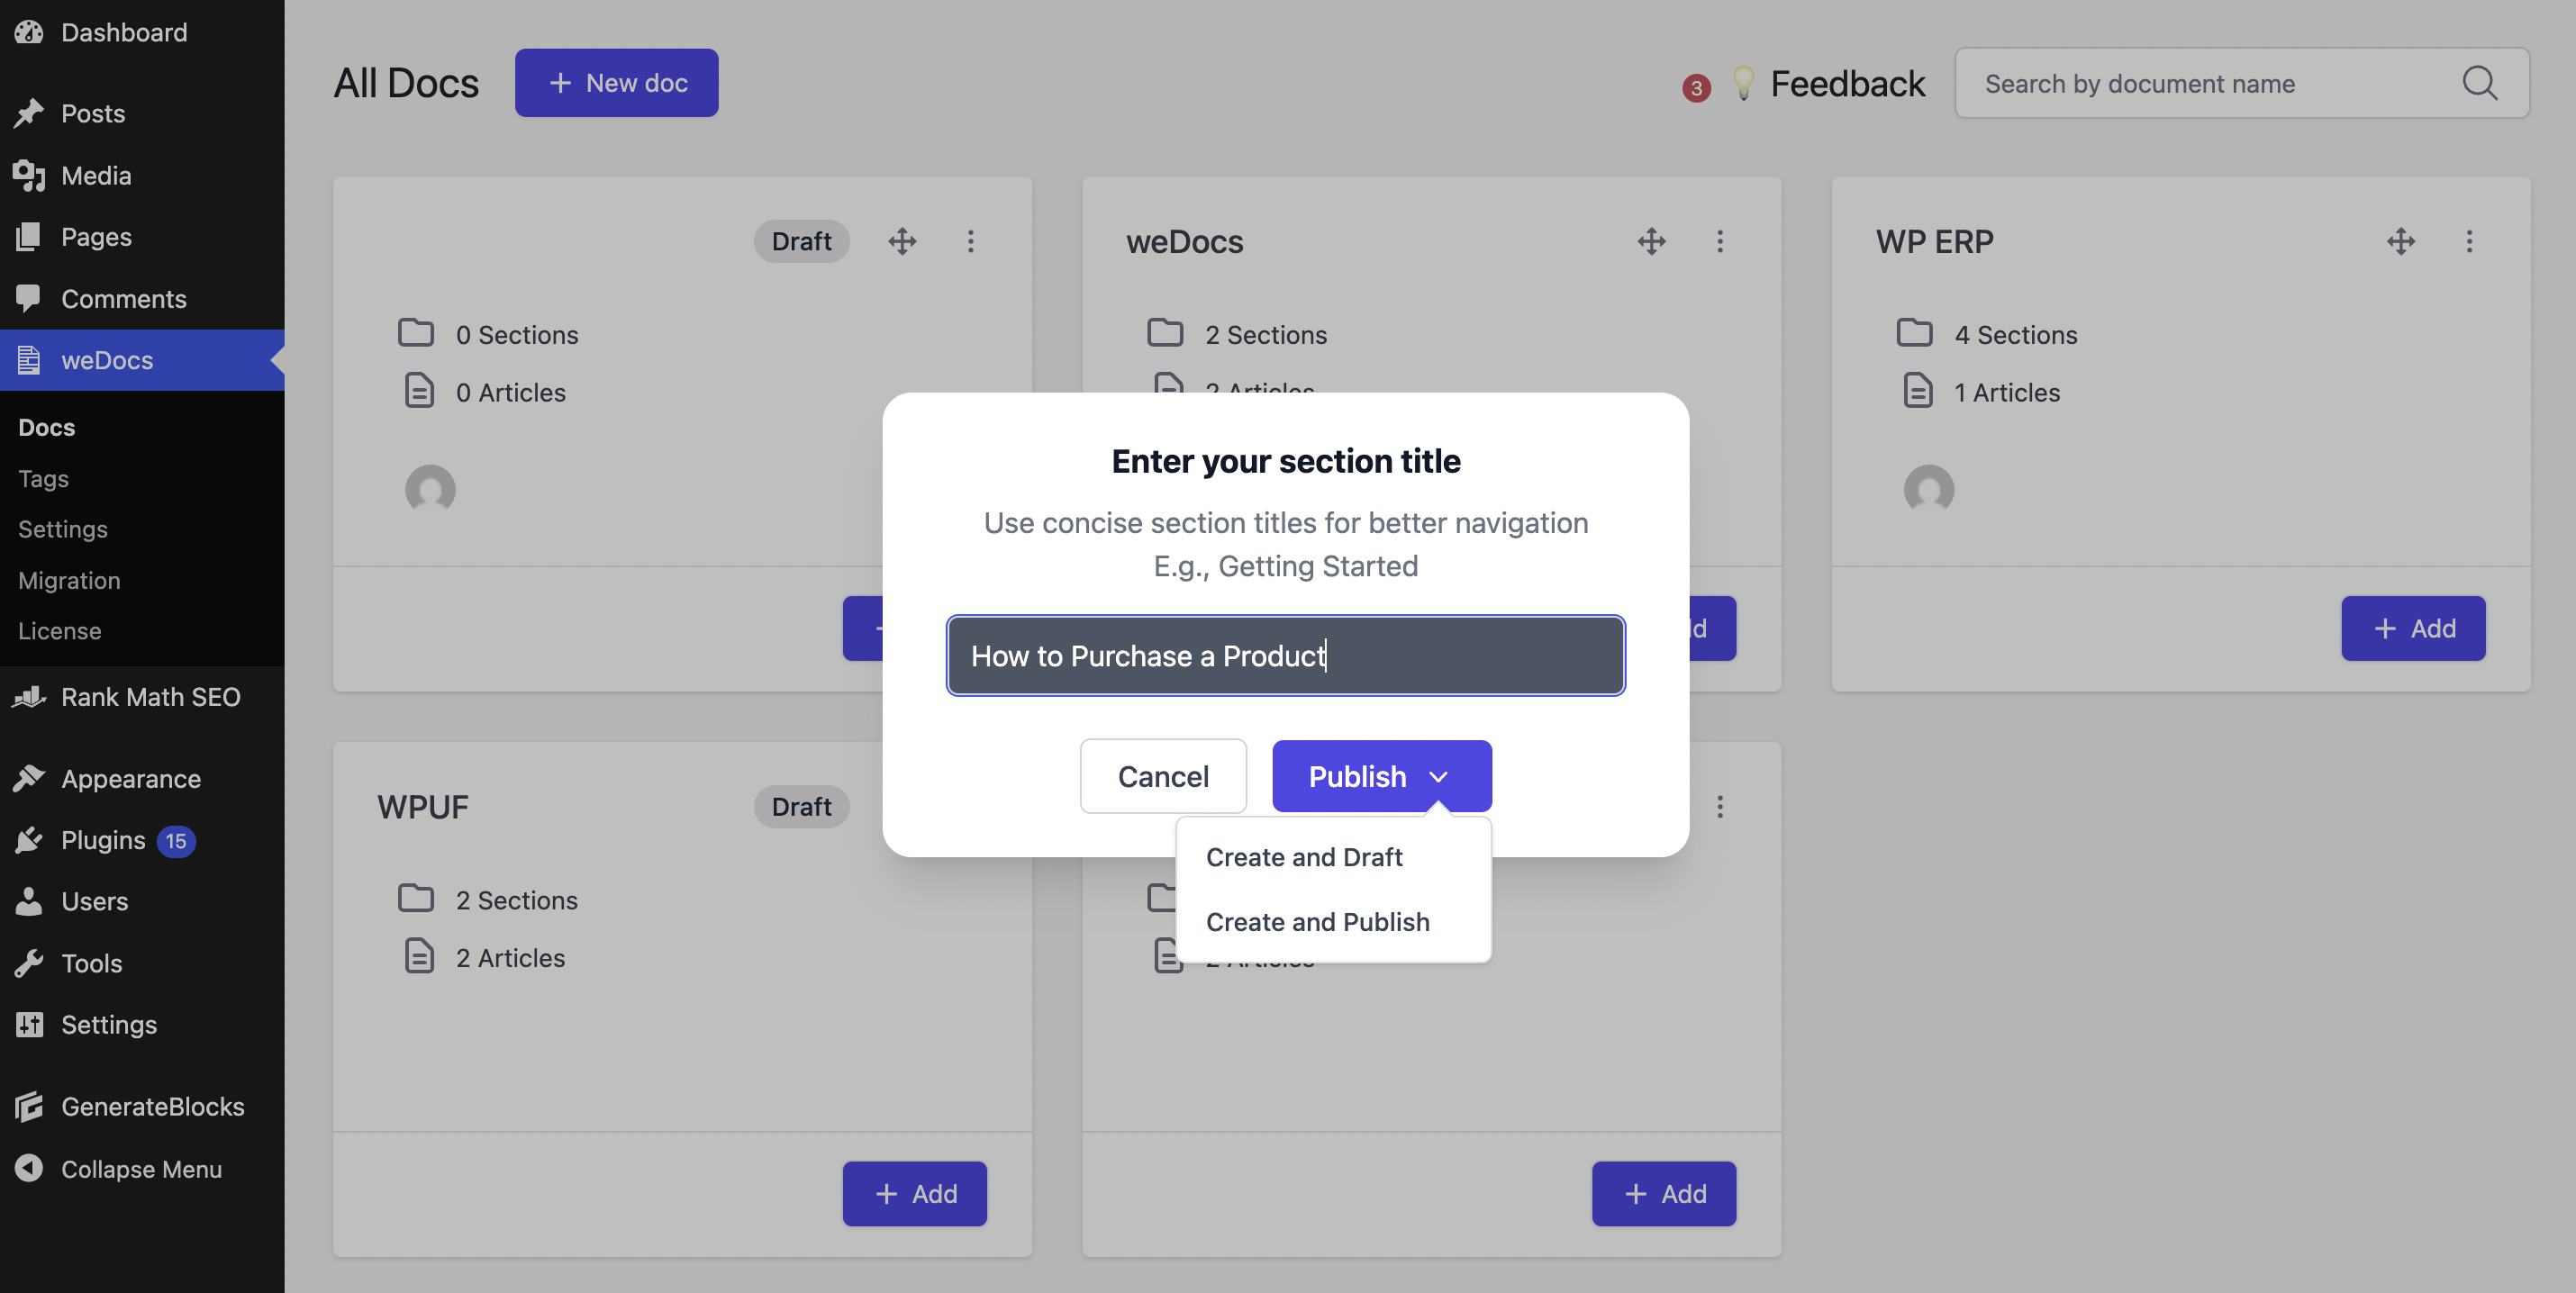
Once your title is set, you can start organizing your documentation by adding sections and articles. Click “+ Add section” or “+ Add article” to open the article creation popup. Each article must be assigned to a section, so it’s best to create a section first. Enter your section name in the “Type a section name” field, then continue adding articles under it.
Hit the “Publish” button, then select Create and Publish to make it live immediately, or Create and Draft to save without publishing.
Step 4: Structure and Categorize Your Content
A cluttered knowledge base defeats its purpose. That’s why organizing content properly matters.
With weDocs, you can structure your documentation using weDocs’s 7-layer hierarchical system, which allows you to create clear categories and subcategories.
For example, in a customer-facing knowledge base, you can group content under sections like Getting Started, Billing, and Technical Support, then break them down further into multiple levels. This layered structure makes information easier to find and easier to manage. To improve navigation even more, use tags and labels so users can quickly locate the right answers.

Step 5: Create High-Quality Content Using the Block Editor
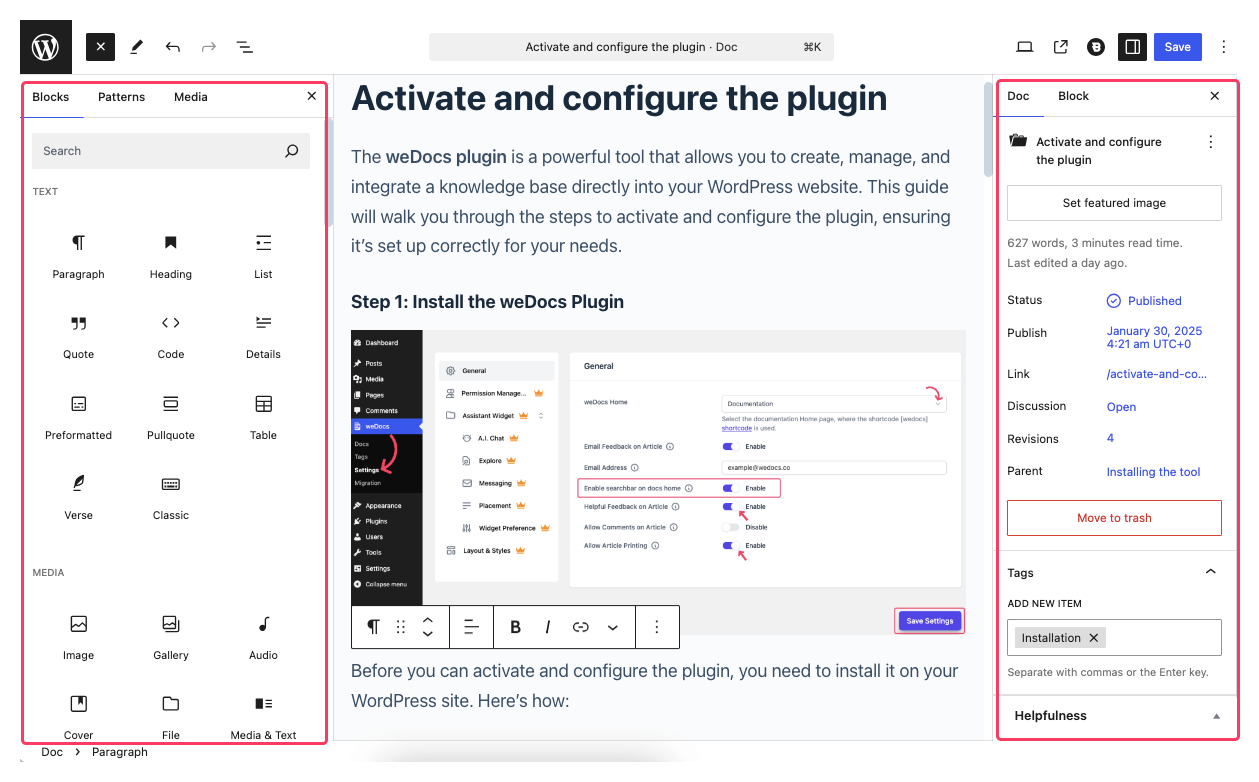
Click on the section or article you created earlier to open it in the editor. weDocs uses the WordPress block editor, so you get the same familiar editing experience used for posts and pages. Instead of working in one long text area, you can add, arrange, and customize individual blocks for different types of content.
This makes it easy to build clean and flexible documentation. You can use all these block editor features while working inside weDocs. Below is a quick look at the weDocs editor with its two default side panels.
The quality of your content plays a big role in how effective your knowledge base becomes. Use simple language, add visuals like screenshots or short videos, and focus on solving one clear problem in each article.
You can also save time by repurposing existing resources such as FAQs, user manuals, or training documents. While writing, make sure your content stays accurate and up to date, uses a tone that connects with your audience, and is easy to read with clear headings, bullet points, and short paragraphs.
Step 6: Create Helpful Content Using the AI Doc Writer
The AI Doc Writer helps you create clear and structured documentation faster. Instead of starting from scratch, you can use it to generate drafts, improve wording, and organize content more easily. This is useful when you are documenting features, writing FAQs, or updating existing articles.

You can guide the AI by adding a short prompt or topic. From there, it helps you build content that is simple, readable, and easy for users to follow.
After generating the draft, you can review it, make small edits, and publish it when ready. This saves time and keeps your self-service help center consistent and up to date.
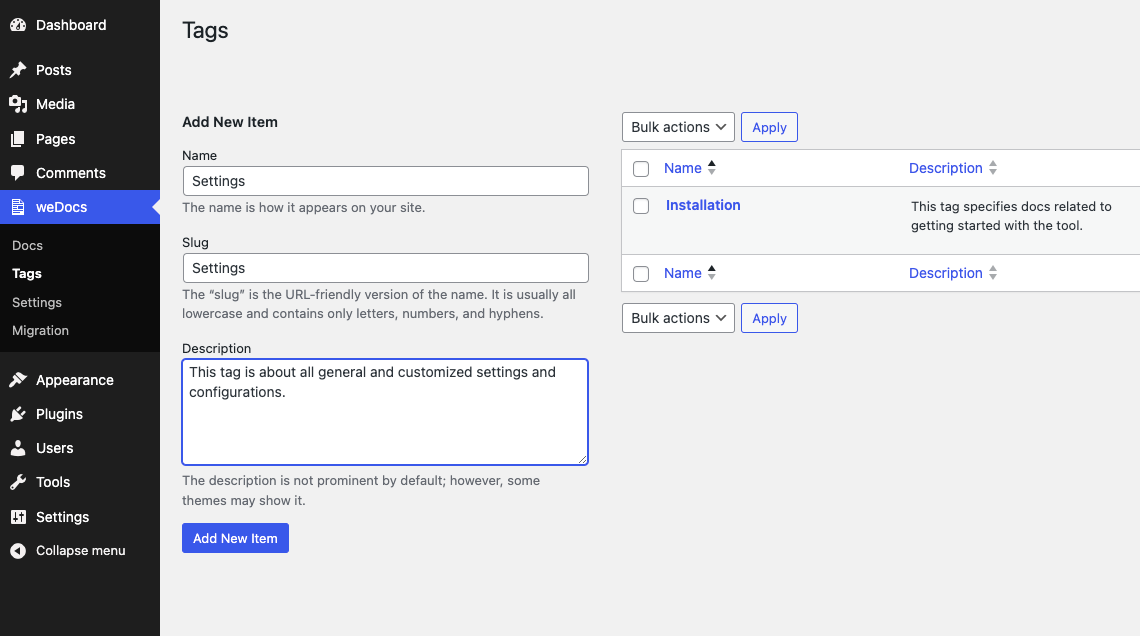
Step 7: Add Essential Tags to the Docs
weDocs features a dedicated tag management section, allowing you to create tags with a specified description and URL. All relevant articles are then grouped under these tags. Anyone following a tag can access a particular page showcasing all related resources.
Step 8: Enable Search Functionality
A searchable knowledge base saves time and frustration. With weDocs, users can quickly locate the information they need using intelligent search capabilities that prioritize relevant results.
Navigate to weDocs → Settings → General, then enable the search bar on docs home.
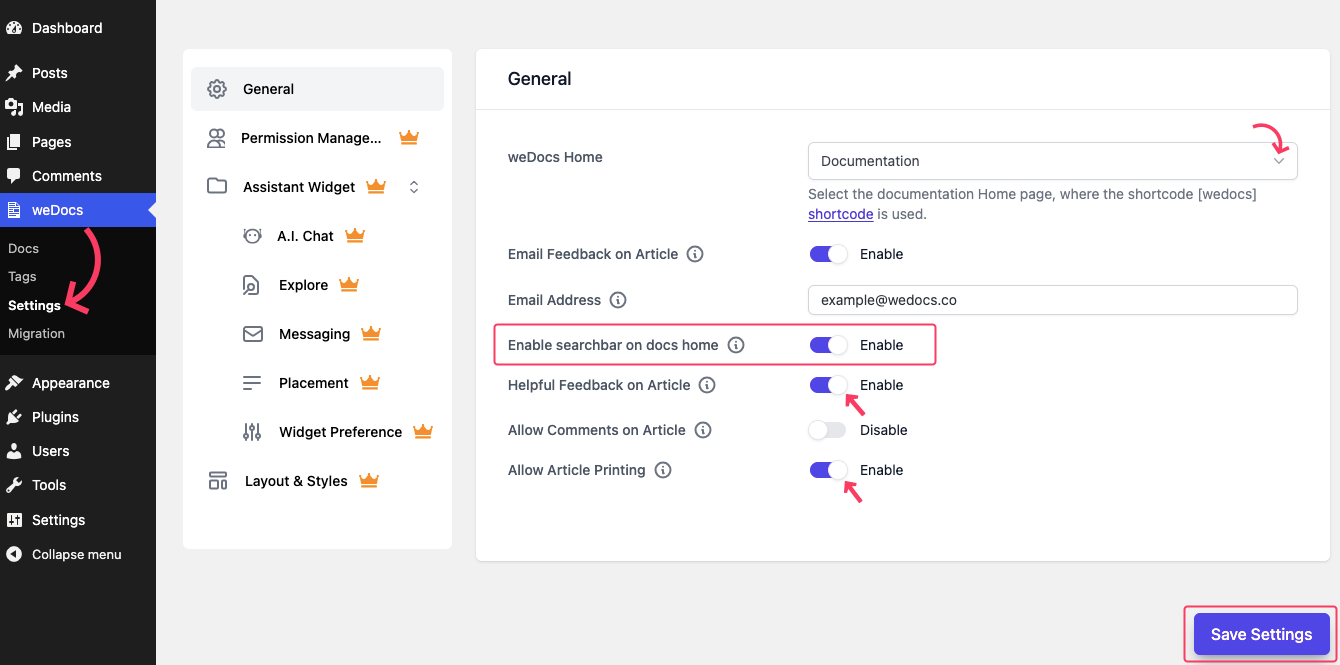
Other important settings include: Setting up weDocs Home, Helpful Feedback on Article, Allow Article Printing, and more. Explore these options to learn how you can reap the full benefits of weDocs.
Step 9: Integrate AI Chatbot
You can take your knowledge base a step further by enabling the AI-powered chatbot in weDocs. This feature lets users ask questions in natural language and get instant, accurate answers pulled directly from your documentation. It improves the support experience and reduces repetitive queries for your support team.
To enable it, go to the Settings page in weDocs and open the A.I. Chat widget section. From the top-right corner, toggle the Enable button to turn it on. Once activated, you can also customize the appearance of the AI chat assistant to match your site’s design.
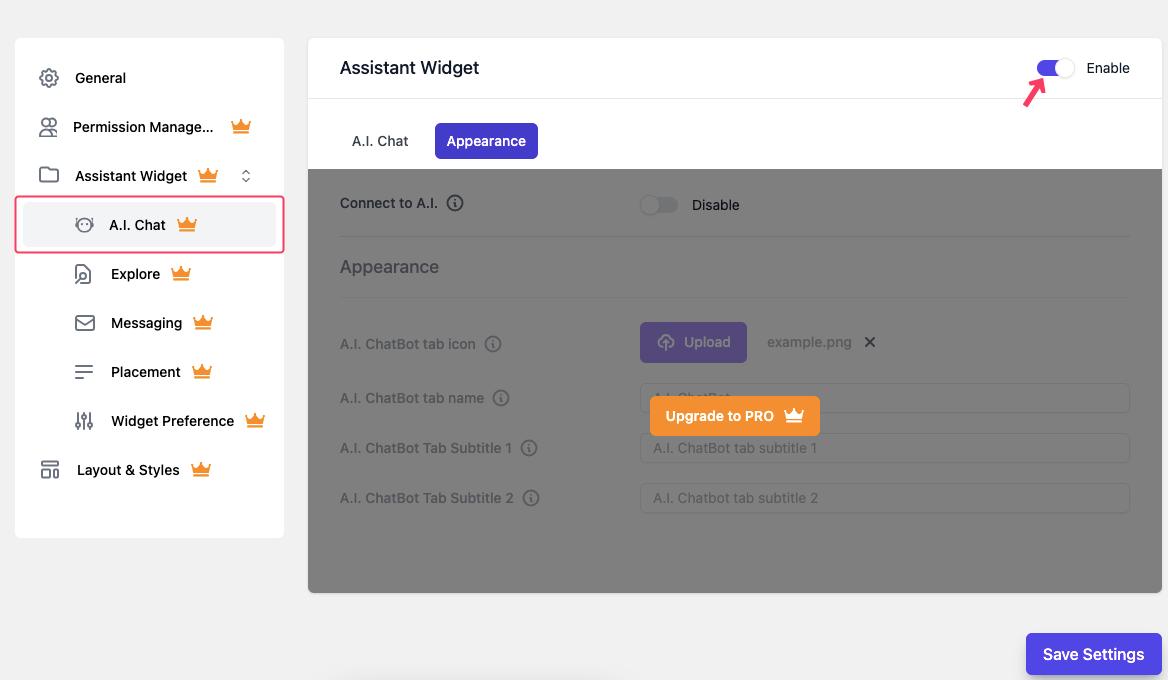
Note: The AI Chatbot widget is available as a paid add-on. So, you need to upgrade to the PRO version to use this feature.
Step 10: Add More Advanced Functionalities
You can add advanced functionalities to enhance your knowledge base with weDocs PRO. The weDocs PRO plugin offers a range of powerful premium features that enhance your knowledge base. With the PRO version, you can:
- Manage user access with role-based permissions
- Set privacy controls for individual documents
- Get smart article suggestions for better navigation
- Use the instant search Assistant Widget to find content quickly
- Choose from pre-built layouts and styles for a polished look
- Enable a floating contact form within the Assistant Widget
And much more! Take your knowledge base to the next level with weDocs PRO!
Mistakes to Avoid While Creating a Self-Service Help Center
Here are some common mistakes to avoid when creating a self-service help center. Keeping these in mind will help you build content that is actually useful for your users.
- Making content hard to find: If users cannot quickly find answers, they will leave and contact support instead.
- Using complex language: Long sentences and technical words confuse users. Keep explanations simple and clear.
- Not updating old articles: Outdated information creates trust issues and leads to more support requests.
- Ignoring search behavior: A self-service help center should reflect how users search, not how the team thinks.
- Creating too many categories: Too much structure can feel overwhelming. Keep navigation simple.
- Not testing on mobile: Many users access help from mobile devices. Poor mobile experience hurts usability.
- Skipping user feedback: Feedback helps improve content. Ignoring it means missing real user problems.
- Relying only on written content: Sometimes images or short videos explain things better than text alone.
Avoiding these mistakes will make your self-service help center easier to use and more effective over time.
Conclusion
A self-service help center is one of the simplest ways to improve customer support without adding more pressure on your team. When users can find answers on their own, they move faster and feel more confident using your product.
With the right structure, clear content, and helpful tools like weDocs, you can build a self-service help center that grows with your business. Keep the content simple, update it often, and pay attention to how users search for help. Over time, your help center becomes more than support pages. It becomes a reliable place users trust whenever they need help.
Subscribe to
weDocs blog
We send weekly newsletters,
no spam for sure!